GitHub Actions
Overview
GitHub Actions is a continuous integration service launched by GitHub. Workflows can be created to build and test each pull request for a repository, or to deploy merged pull requests to a production environment. GitHub Actions goes beyond DevOps and allows you to run workflows when other events occur in the repository. For example, you can run workflows to automatically add the appropriate tags when someone creates a new issue in your repository. GitHub provides Linux, Windows, and macOS virtual machines to run workflows, or you can host your own self-hosted runner in your own data center or cloud infrastructure.
What can it do?
GitHub Actions supports most of the languages you know, and you can use it for code checking, testing, CI/CD, project management, and even running Kubernetes.
If we want to search for some common actions, we generally think of awesome actions, and you can also search at GitHub Market to search.
Core Concepts
3 main points: workflow, operations, and steps. For the rest, please look up documentation on your own. But then again, it’s enough to understand these 3 concepts. Once you know how it works, you can think about what steps you need to do each thing in your head, and then search for ready-made steps you can use, but of course, there’s no solution, so you have to create your own.
First, let’s talk about the workflow. If you want to do something on GitHub, you have to have a repository, which is the most basic requirement. Second, as you may have noticed before, many repositories have a .github/workflows folder, which is a requirement for GitHub Actions. Under that folder, you’ll find YAML files, which are actually the yaml files for a workflow.
For example, if I create a new github-actions-demo.yml file, I’m creating a workflow named github-actions-demo. Of course, the name can be configured in the yaml file.

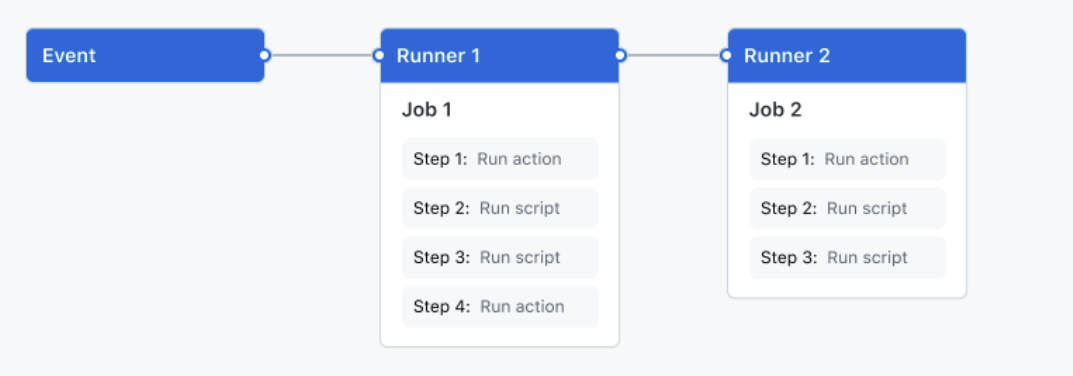
Here’s an image I copied from the documentation, based on which we can understand the 3 concepts. A “workflow” is an automated process that can be configured to run when triggered by an event defined in the YAML file, or can be triggered manually or at regular intervals. We can see that a workflow can contain multiple “jobs”, i.e. jobs, for example you can define job1, job2 … In each job, there can also be multiple “steps”, which can be custom scripts, other operations, and so on.
A new concept is mentioned here, called “events”. It can be understood as “event-triggered process”. For example, you can define someone to create a pr, open an issue, push it to the repository, or run it on a timer to trigger a workflow to run.
Here is an easily misunderstood point, the official diagram looks like each job is run sequentially, but they can also be run in parallel oh~😊
Theoretically, within the limits of GitHub Actions, a single workflow can be run all the time, and that makes it much more playable! But it’s not recommended for other uses (someone once used this for mining), after all, it’s a free resource, so you can’t abuse it.
Spring Boot
Before Spring Cloud, we need to talk about Spring Boot, on which it is also based after all. Let’s use the Pisces-Lfs project, which is based on Spring Boot, as an example. Since we are building a Docker-based image, we have to write the Dockerfile file first.
|
|
Then we create the docker-buildx.yml file.
|
|
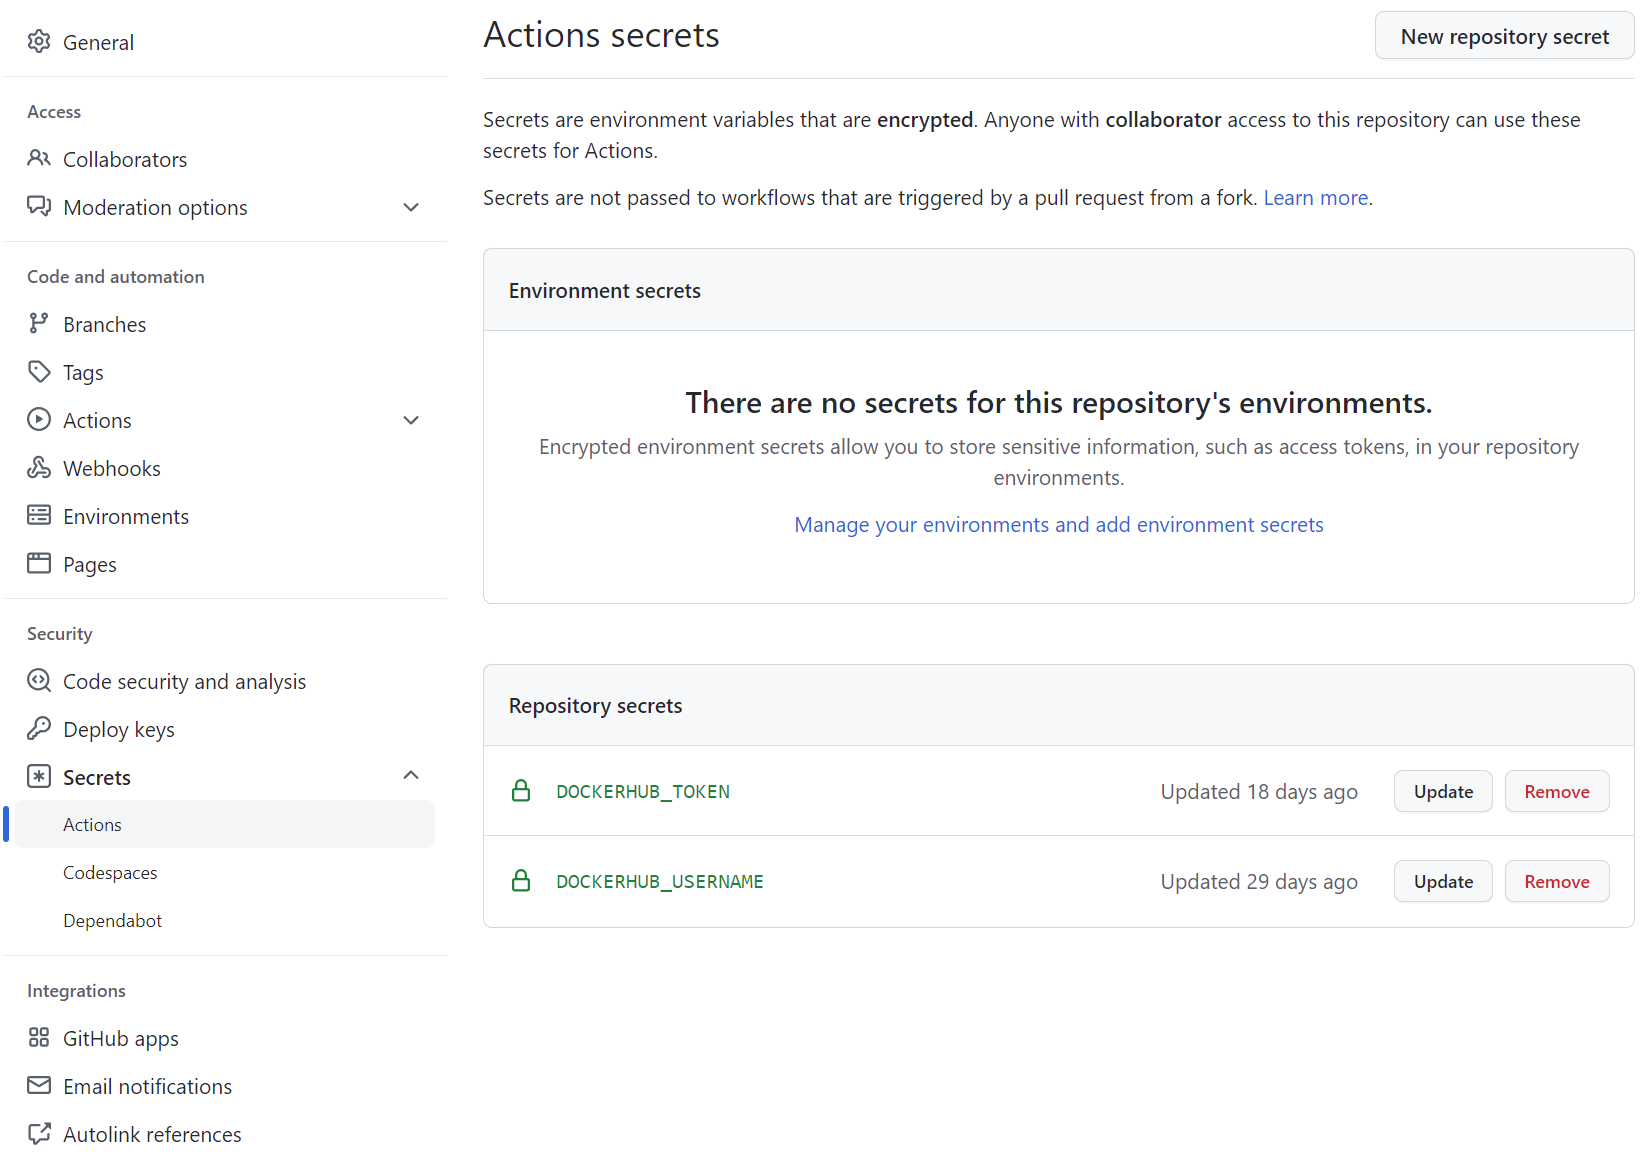
In the workflow, there are places where environment variables are used, i.e. user name and token, which cannot be placed directly in the file, otherwise it would be leaked. Generally, we store them in Actions secrets and read them using the environment variable configuration, as shown in the following figure.

Spring Cloud
After understanding how Spring Boot was built automatically through github actions in the previous section, Spring Cloud is actually quite simple. I’ll use my own Pisces-Cloud project as an example. A submodule under a microservice, assuming it’s all in one project space, usually only requires one build to get all the services built. Then the problem is much better.
Again, we create a Dockerfile file for each service, and then a new docker-buildx.yml file.
|
|
Notice the difference? In fact, there are only more “steps”, that is, each Dockerfile creates a separate “step” to package the image, and you just need to put all these steps after the maven build.
Some suggestions
I only provide a container build solution for both x86 and arm platforms, the rest of the functionality is actually implemented by Docker itself.
For example, here the Docker container sets JVM parameters at startup, and configuration parameters.
For release images, a more standardized way to play in the open source community is to create release.yml files that trigger events and perform workflows by tagging branches.
Reference https://blog.besscroft.com/articles/2022/spring-cloud-on-github-actions/