Pagination is an important feature for REST API, and is used for many use cases where we want to fetch only a small part of an entire dataset. It might be for performance reasons, and fetch only the data needed at that time. It can also be used by the frontend to display items using a paginated view type of UI such as infinite scrolling.
Spring Boot provides a pagination feature integrated into the spring data JPA library, making it easy to integrate such a mechanism in our own REST API.
Let’s check this out!
Project setup
This section is dedicated to the project setup. You can skip this part and go straight to the implementation if you are not interested.
The first step is to generate the spring boot project using spring initializr. In this tutorial, We are using the spring CLI via SDKman, but it can easily be done using the web UI https://start.spring.io/ or directly through your IDEA https://www.jetbrains.com/help/idea/spring-boot.html.
To have a walkthrough of how to set up the CLI on your own machine, follow this guide https://docs.spring.io/spring-boot/docs/current/reference/html/getting-started.html#getting-started.installing.cli.sdkman. Once you have installed the CLI , execute this command to generate the project with the necessary dependencies.
|
|
We package the following dependencies :
- the web dependency for the REST API
- the spring data JPA for the data access layer, which uses hibernate as the default Object Relational Mapping tool
- the h2 library to provide an easy-to-use in-memory embedded database. This type of database is suited for small toy projects such as this one, but it should not be used for any serious project that will be shipped to production at some point
- Lombok to generate snippets of code through annotation and avoid any boilerplate code
Once the project has been generated, we need to set some properties in the application.yml file
We explicitly set the port at which our application can be reached. The default port has a value of 8080, but this port is often used by many applications and systems, so overwriting this default value will lessen the probability of port collision and save us some headaches on future debugging.
Spring boot will automatically detect that we use an h2 two database by scanning the dependency, so no need to specify anything about the driver, the database platform, or the dialect.
Defining the data model
We first define the model for the entity.
As an example, we will use a Plant entity, containing the plant’s common name, scientific name, family, and date of creation.
|
|
We define a JPA entity and skip any form of validation constraints that we could declare using hibernate validator.
We also do not consider any domain-driven design constraint given the simplicity of the project.
Defining the data layer
For the data layer, we make use of the spring JPA repository provided by the spring-boot-starter-data-jpa dependency.
By implementing the PagingAndSortingRepository interface, we automatically have access to basic CRUD operations such as find, add or delete, provided by the CrudRepository Interface. But what is more important in our case is the findAll(Pageable) method made available by the repository. This method returns a Page with T being the type of the entity, which, in this context, is the Plant entity.
The PagingAndSortingRepository is a generic interface, with the first generic representing the type of entity handled by the repository, and the second generic parameter representing the type of Id used by the entity. In our case, we have previously declared the id field of the Plant entity as a Long.
Check out the official Spring documentation to have a complete overview of what Spring JPA Repositories are capable of https://docs.spring.io/spring-data/jpa/docs/current/reference/html/#jpa.repositories.
Defining the business layer
We then define the service that represents the business layer of the application.
|
|
We define our class as a @Service so that spring can auto-configure it on application startup during Beans instantiation. We could also use the @Component annotation, but using the @Service annotation for Bean part of the service layer is more semantic.
We use a PageSettings POJO to group all pagination-related parameters and avoid passing too many arguments.
|
|
The @Data annotation provided by Lombok generates all setters and getters, a constructor taking all required parameters, which is none for this class, as well as basic methods like toString(), equals, and hashCode.
We build the Sort object that will be required for the pagination based on the key and the direction fields.
The key is the name of the property on which the plant will be sorted and the direction defines the direction by which the plant will be sorted.
Be aware that the property selected as key must be unique, otherwise you can receive the same element twice on two different pages.
Coming back to the PlantService, we inject the PlantRepository defined earlier, and make use of the findAll method to get a Page instance containing the list of Plants for the requested page, as well as other useful properties such as the total amount of elements, the total amount of pages, and many more.
Defining the web layer
Finally, let’s create the web layer and expose the endpoint to fetch a page of plants by creating a Spring Controller.
|
|
In the same way as the @Service earlier, we use the @RestController annotation to define the class as a Component in a more semantic way. This annotation also contains the @ResponseBody annotation, which will automatically serialize the response returned from the controller methods.
We also make use of a PageToPageDTOMapper :
|
|
Using this mapper, we only return what is needed by the client of the API. This part is optional, and we could directly return the Page object, but I like to clearly define what is returned and have control over the contract of the API.
Putting it all together
We use the ApplicationRunner functional interface to initialize the sample data.
|
|
For demonstration purposes, we define the Bean directly in the main Application class.
The run method takes the PlantRepository as an argument, using Spring dependency injection. The method is executed during the application startup, right after the context initialization, and before the startup of the spring boot application.
You might have noticed that we did not declare the data SQL schema anywhere. Because our database is an embedded database, the property spring.jpa.hibernate.ddl-auto is set to create-drop by default, and our database schema is automatically generated.
We can finally run our application either through the IDE or using the command line with the following command:
|
|
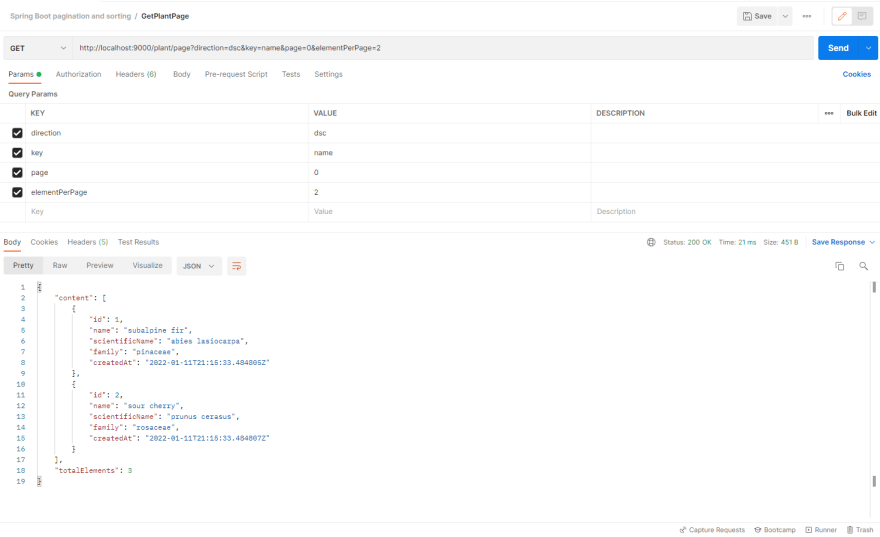
To fetch the pagination endpoint, we can use the popular API platform Postman.

Or we can use a simple cURL command by providing the necessary parameters
|
|
Of course, this demo shows only the basics of pagination, but it provides a good starting point if you need such a feature for your REST API.
You can access the demo project for this blog post here https://github.com/Mozenn/spring-boot-rest-api-with-pagination-and-sorting.
Reference https://dev.to/mozenn/build-a-spring-boot-rest-api-with-pagination-and-sorting-3o53