In this article, we will learn about RabbitMQ and explore its common use-cases. We will also walk through a step-by-step guide to implement messaging using RabbitMQ in a Spring Boot Application and will see how to publish and consume messages in a queue using RabbitMQ. So, let’s begin learning!
What is a RabbitMQ?
RabbitMQ is an open-source message broker that allows enterprise applications to communicate with each other. It’s a popular AMQP (Advanced Message Queuing Protocol)broker. Various programming languages provide support for RabbitMQ.
Why do we need a Messaging Queue?
Communication is a two-way process; we may receive an immediate response, but we may also receive a response after some time. In the latter case, we do not wait until the response arrives and therefore we can continue our own work, as we are not dependent on the response. Similarly, in the world of Softwares communication works the same way.
Consider an analogy of a mailbox where you send your letter or email to the recipient via mail service and you are assured that it will be received. Here mailbox is the RabbitMQ. RabbitMQ receives, stores, and forwards the data or messages. It is important to note that communication is Asynchronous in the messaging queue, which means the sender and receiver do not need to interact with the message at the same time.
Key-Components in Messaging via RabbitMQ
Below is the image that depicts the workflow and key components involved in the messaging via RabbitMQ.
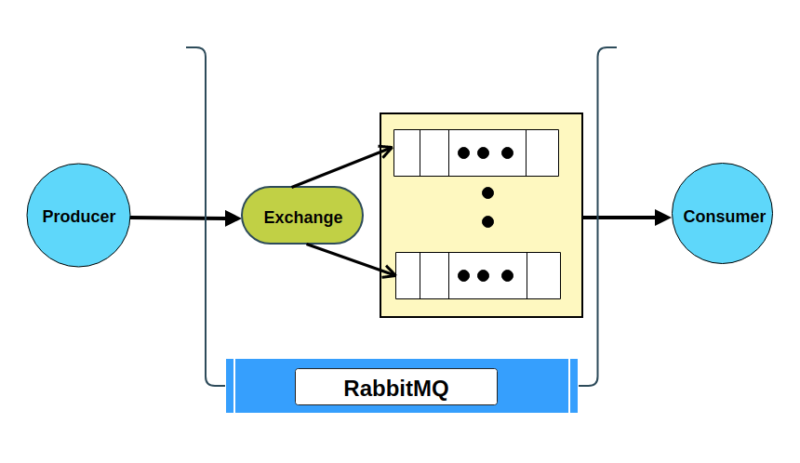
- Message: A message is a form of data that is shared from the producer to the consumer. The data can hold requests, information, meta-data, etc.
- Producer: A producer is a user program that is responsible to send or produce messages.
- Exchange: Exchanges are message routing agents, it is responsible to route the messages to different queues with the help of header attributes, bindings, and routing keys. Binding is the link between a queue and the exchange. Whereas, the R outing K ey is the address that the exchange uses to determine which queue the message should be sent to.
- Queue: A queue is a mailbox or a buffer that stores messages. It has certain limitations like disk space and memory.
- Consumer: A consumer is a user program that is responsible to receive messages.
Common Use-Cases of using Messaging Queue
In real life, we frequently deal with the application of messaging queues. Take, for example, a messaging queue application at a coffee shop to demonstrate the use-case.
When you enter the coffee shop, the front desk worker greets you, takes your order, and gives you an order number. The order is sent to the kitchen, where your drink will be prepared. The kitchen crew received your order and began preparing it. While the kitchen crew prepares your food, the front-line employee does not sit around waiting for your order. Rather, he continues to work and entertain other customers. Similarly, the kitchen crew receives increased orders for drink preparation. However, the delivery of order happens in order. As a result, neither frontline workers nor kitchen employees are dependent on one another; instead, they are aware of their roles and continue to work as independent entities.
There are many use-cases of Messaging Queue such as:
- Decoupling: We need a way to decouple communication between different services or applications.
- High Response Time: When the response time of a request is too much. For example, calculations, searching or pdf creation, etc.
- Background Jobs: Sending background messages, emails, or notifications to loads of users.
- Asynchronous Messaging: Messaging queues are the best way to implement asynchronous programming.
Prerequisite Steps
To begin with the RabbitMQ integration with the Spring Boot Application, the primary step is to download and install RabbitMQ on your local machine. There are two common ways to set up RabbitMQ on your local machine.
- Via Docker Container. You can refer to this blog post to run RabbitMQ on your machine via Docker.
- Using the installer. You can follow directions from the official RabbitMQ website to install RabbitMQ as per your operating system. For MAC OS, you can refer to this blog.
RabbitMQ is accessible by default over port 15672 once setup is complete and RabbitMQ is running.
Implement messaging using RabbitMQ with Spring Boot Application
Create a Maven, Spring Boot Project in any of your favorite IDE. Refer to this article for more details.
pom.xml
Following is a complete pom.xml file that contains the RabbitMQ dependencies.
 1
 2
 3
 4
 5
 6
 7
 8
 9
10
11
12
13
14
15
16
17
18
19
20
21
22
23
24
25
26
27
28
29
30
31
32
33
34
35
36
37
38
39
40
41
42
43
44
45
46
47
48
49
50
51
52
|
<?xml version="1.0" encoding="UTF-8"?>
<project xmlns="http://maven.apache.org/POM/4.0.0"
         xmlns:xsi="http://www.w3.org/2001/XMLSchema-instance"
         xsi:schemaLocation="http://maven.apache.org/POM/4.0.0 http://maven.apache.org/xsd/maven-4.0.0.xsd">
    <modelVersion>4.0.0</modelVersion>
    <parent>
        <groupId>org.springframework.boot</groupId>
        <artifactId>spring-boot-starter-parent</artifactId>
        <version>2.5.6</version>
        <relativePath/>
        <!-- lookup parent from repository -->
    </parent>
    <groupId>org.example</groupId>
    <artifactId>RabbitMQSpringBootExample</artifactId>
    <version>1.0-SNAPSHOT</version>
    <properties>
        <maven.compiler.source>11</maven.compiler.source>
        <maven.compiler.target>11</maven.compiler.target>
        <spring.ampqp.version>2.2.9.RELEASE</spring.ampqp.version>
        <springboot-version>2.5.6</springboot-version>
        <lombok.version>1.18.12</lombok.version>
    </properties>
    <dependencies>
        <!-- Spring Boot -->
        <dependency>
            <groupId>org.springframework.boot</groupId>
            <artifactId>spring-boot-starter-web</artifactId>
            <version>${springboot-version}</version>
        </dependency>
        <dependency>
            <groupId>org.springframework.amqp</groupId>
            <artifactId>spring-amqp</artifactId>
            <version>${spring.ampqp.version}</version>
        </dependency>
        <!-- https://mvnrepository.com/artifact/org.springframework.amqp/spring-rabbit -->
        <dependency>
            <groupId>org.springframework.amqp</groupId>
            <artifactId>spring-rabbit</artifactId>
            <version>${spring.ampqp.version}</version>
        </dependency>
        <dependency>
            <groupId>org.apache.logging.log4j</groupId>
            <artifactId>log4j-core</artifactId>
            <version>2.15.0</version>
        </dependency>
        <dependency>
            <groupId>org.projectlombok</groupId>
            <artifactId>lombok</artifactId>
            <version>${lombok.version}</version>
        </dependency>
    </dependencies>
</project>
|
application.properties
This is how the application.properties file looks like. Add RabbitMQ specific properties where:
- rabbitmq.host: RabbitMQ host
- rabbitmq.virtualhost: Virtual host to use when connecting to the broker.
- rabbitmq.port: RabbitMQ port
- rabbitmq.username: Login user to authenticate to the broker.
- rabbitmq.password: Log in to authenticate against the broker.
- rabbitmq.exchange: The name of the exchange to use for send operations.
- rabbitmq.queue: The name of the message queue where messages are saved.
- rabbitmq.routingkey: Name of the routing key.
- rabbitmq.reply.timeout: Timeout is enforced on consumer delivery acknowledgment. This helps detect buggy consumers that never acknowledge deliveries.
- rabbitmq.concurrent.consumers: This field is important when we are with multiple producers and consumers reading/writing from the same queue.
- rabbitmq.max.concurrent.consumers: It shows the number of concurrent consumers, but in our example, we are working with a single consumer only.
 1
 2
 3
 4
 5
 6
 7
 8
 9
10
11
12
|
#RabbitMQ settings
rabbitmq.host=localhost
rabbitmq.virtualhost=/
rabbitmq.port=15672
rabbitmq.username=guest
rabbitmq.password=guest
rabbitmq.exchange=rabbitmq.exchange
rabbitmq.queue=rabbitmq.queue
rabbitmq.routingkey=rabbitmq.routingkey
rabbitmq.reply.timeout=60000
rabbitmq.concurrent.consumers=1
rabbitmq.max.concurrent.consumers=1
|
Define the RabbitMQ Configuration Class
In our example, we are disabling the default behavior of RabbitMQ by disabling RabbitAutoConfiguration class.
We need a custom Configuration class to declare @Bean ourselves and configure them as wanted because we are not using boot autoconfiguration. This allows us to adapt Beans according to our RabbitMQ server specifications. One of the use-cases of using the custom Configuration class is to give us leverage to connect to the remote RabbitMQ server to an IP Address and valid credentials.
  1
  2
  3
  4
  5
  6
  7
  8
  9
 10
 11
 12
 13
 14
 15
 16
 17
 18
 19
 20
 21
 22
 23
 24
 25
 26
 27
 28
 29
 30
 31
 32
 33
 34
 35
 36
 37
 38
 39
 40
 41
 42
 43
 44
 45
 46
 47
 48
 49
 50
 51
 52
 53
 54
 55
 56
 57
 58
 59
 60
 61
 62
 63
 64
 65
 66
 67
 68
 69
 70
 71
 72
 73
 74
 75
 76
 77
 78
 79
 80
 81
 82
 83
 84
 85
 86
 87
 88
 89
 90
 91
 92
 93
 94
 95
 96
 97
 98
 99
100
101
102
103
104
105
106
107
108
109
|
package org.appsdeveloper.config;
import com.fasterxml.jackson.databind.ObjectMapper;
import org.apache.logging.log4j.LogManager;
import org.apache.logging.log4j.Logger;
import org.springframework.amqp.core.*;
import org.springframework.amqp.rabbit.annotation.EnableRabbit;
import org.springframework.amqp.rabbit.config.SimpleRabbitListenerContainerFactory;
import org.springframework.amqp.rabbit.connection.CachingConnectionFactory;
import org.springframework.amqp.rabbit.connection.ConnectionFactory;
import org.springframework.amqp.rabbit.core.RabbitAdmin;
import org.springframework.amqp.rabbit.core.RabbitTemplate;
import org.springframework.amqp.rabbit.listener.ConditionalRejectingErrorHandler;
import org.springframework.amqp.rabbit.support.ListenerExecutionFailedException;
import org.springframework.amqp.support.converter.Jackson2JsonMessageConverter;
import org.springframework.amqp.support.converter.MessageConverter;
import org.springframework.beans.factory.annotation.Value;
import org.springframework.context.annotation.*;
import org.springframework.util.ErrorHandler;
@EnableRabbit
@Configuration
public class RabbitMQConfig {
    @Value("${rabbitmq.queue}")
    private String queueName;
    @Value("${rabbitmq.exchange}")
    private String exchange;
    @Value("${rabbitmq.routingkey}")
    private String routingkey;
    @Value("${rabbitmq.username}")
    private String username;
    @Value("${rabbitmq.password}")
    private String password;
    @Value("${rabbitmq.host}")
    private String host;
    @Value("${rabbitmq.virtualhost}")
    private String virtualHost;
    @Value("${rabbitmq.reply.timeout}")
    private Integer replyTimeout;
    @Value("${rabbitmq.concurrent.consumers}")
    private Integer concurrentConsumers;
    @Value("${rabbitmq.max.concurrent.consumers}")
    private Integer maxConcurrentConsumers;
    @Bean
    public Queue queue() {
        return new Queue(queueName, false);
    }
    @Bean
    public DirectExchange exchange() {
        return new DirectExchange(exchange);
    }
    @Bean
    public Binding binding(Queue queue, DirectExchange exchange) {
        return BindingBuilder.bind(queue).to(exchange).with(routingkey);
    }
    @Bean
    public MessageConverter jsonMessageConverter() {
        ObjectMapper objectMapper = new ObjectMapper();
        return new Jackson2JsonMessageConverter(objectMapper);
    }
    @Bean
    public ConnectionFactory connectionFactory() {
        CachingConnectionFactory connectionFactory = new CachingConnectionFactory();
        connectionFactory.setVirtualHost(virtualHost);
        connectionFactory.setHost(host);
        connectionFactory.setUsername(username);
        connectionFactory.setPassword(password);
        return connectionFactory;
    }
    @Bean
    public AmqpTemplate rabbitTemplate(ConnectionFactory connectionFactory) {
        final RabbitTemplate rabbitTemplate = new RabbitTemplate(connectionFactory);
        rabbitTemplate.setDefaultReceiveQueue(queueName);
        rabbitTemplate.setMessageConverter(jsonMessageConverter());
        rabbitTemplate.setReplyAddress(queue().getName());
        rabbitTemplate.setReplyTimeout(replyTimeout);
        rabbitTemplate.setUseDirectReplyToContainer(false);
        return rabbitTemplate;
    }
    @Bean
    public AmqpAdmin amqpAdmin() {
        return new RabbitAdmin(connectionFactory());
    }
    @Bean
    public SimpleRabbitListenerContainerFactory rabbitListenerContainerFactory() {
        final SimpleRabbitListenerContainerFactory factory = new SimpleRabbitListenerContainerFactory();
        factory.setConnectionFactory(connectionFactory());
        factory.setMessageConverter(jsonMessageConverter());
        factory.setConcurrentConsumers(concurrentConsumers);
        factory.setMaxConcurrentConsumers(maxConcurrentConsumers);
        factory.setErrorHandler(errorHandler());
        return factory;
    }
    @Bean
    public ErrorHandler errorHandler() {
        return new ConditionalRejectingErrorHandler(new MyFatalExceptionStrategy());
    }
    public static class MyFatalExceptionStrategy extends ConditionalRejectingErrorHandler.DefaultExceptionStrategy {
        private final Logger logger = LogManager.getLogger(getClass());
        @Override
        public boolean isFatal(Throwable t) {
            if (t instanceof ListenerExecutionFailedException) {
                ListenerExecutionFailedException lefe = (ListenerExecutionFailedException) t;
                logger.error("Failed to process inbound message from queue "
                        + lefe.getFailedMessage().getMessageProperties().getConsumerQueue()
                        + "; failed message: " + lefe.getFailedMessage(), t);
            }
            return super.isFatal(t);
        }
    }
}
|
Key-points of Configuration Class
In the above class, we have configured Beans as per our RabbitMQ properties defined in the application.properties class.
- Use @ EnableRabbit to enable support for Rabbit Listener.
- @Value injects properties from the resource file into the Component classes.
- Define a bean of Queue with a name and mark it as non-durable. Non-durable means that the queue and any messages on it will be removed when RabbitMQ is stopped. On the other hand, restarting the application won’t have any effect on the queue.
- For the exchange, we have four different types, but in our example, we have registered a bean of the DirectExchange type. It routes messages to a queue by matching a complete routing key.
- Then we created a bean for Binding to tie an exchange with the queue.
- To ensure that messages are delivered in JSON format, create a bean for MessageConverter
- Register ConnectionFactory bean to make a connection to RabbitMQ.
- Bean of rabbitTemplate serves the purpose of sending messages to the queue.
- To define RabbitAdmin, declare AmqpAdmin bean or define it in the ApplicationContext. It’s useful if we need queues to be automatically declared and bounded.
- For the container factory bean, we have used SimpleRabbitListenerContainerFactory. It is required since the infrastructure looks for a bean rabbitListenerContainerFactory as the factory’s source for creating message listener containers by default.
- The errorHandler is used to return some user-friendly
Error Object when an exception is thrown by the listener.
Define the Domain Model Class
Keeping the use-case of the Restaurant Management System, we have created a domain class of MenuOrder.
 1
 2
 3
 4
 5
 6
 7
 8
 9
10
11
12
13
14
15
16
17
18
19
20
21
22
23
24
25
26
27
28
29
30
31
32
|
package org.appsdeveloper.domain;
import com.fasterxml.jackson.annotation.JsonProperty;
import lombok.AllArgsConstructor;
import lombok.Getter;
import lombok.NoArgsConstructor;
import lombok.Setter;
import java.io.Serializable;
import java.util.List;
@Getter
@Setter
@NoArgsConstructor
@AllArgsConstructor
public class MenuOrder implements Serializable {
    private static final long serialVersionUID = -1138446817700416884L;
    @JsonProperty
    private String orderIdentifier;
    @JsonProperty
    private int orderId;
    @JsonProperty
    private List<String> orderList;
    @JsonProperty
    private String customerName;
    @Override
    public String toString() {
        return "MenuOrder{" +
                "orderIdentifier='" + orderIdentifier + '\'' +
                ", orderId=" + orderId +
                ", orderList=" + orderList +
                ", customerName='" + customerName + '\'' +
                '}';
    }
}
|
Define the Sender/Receiver Classes
RabbitMQSender.java
Following is an implementation of a service class to send messages in the form of a MenuOrder object to the queue using RabbitTemplate.
 1
 2
 3
 4
 5
 6
 7
 8
 9
10
11
12
13
14
15
16
17
18
19
20
|
package org.appsdeveloper.queue;
import org.apache.logging.log4j.LogManager;
import org.apache.logging.log4j.Logger;
import org.appsdeveloper.domain.MenuOrder;
import org.springframework.amqp.core.AmqpTemplate;
import org.springframework.amqp.core.Queue;
import org.springframework.beans.factory.annotation.Autowired;
import org.springframework.stereotype.Service;
@Service
public class RabbitMQSender {
    @Autowired
    private AmqpTemplate rabbitTemplate;
    @Autowired
    private Queue queue;
    private static Logger logger = LogManager.getLogger(RabbitMQSender.class.toString());
    public void send(MenuOrder menuOrder) {
        rabbitTemplate.convertAndSend(queue.getName(), menuOrder);
        logger.info("Sending Message to the Queue : " + menuOrder.toString());
    }
}
|
- Annotate the class with @Service annotation to inject it as a dependency.
- rabbitTemplate.convertAndSend(queue.getName(), menuOrder); It is the main method that adds a message to the queue after conversion.
RabbitMQReceiver.java
Following is a Listener class to consume messages of a MenuOrder payload type from the queue.
 1
 2
 3
 4
 5
 6
 7
 8
 9
10
11
12
13
14
15
16
|
package org.appsdeveloper.queue;
import org.apache.logging.log4j.LogManager;
import org.apache.logging.log4j.Logger;
import org.appsdeveloper.domain.MenuOrder;
import org.springframework.amqp.rabbit.annotation.RabbitHandler;
import org.springframework.amqp.rabbit.annotation.RabbitListener;
import org.springframework.stereotype.Component;
@Component
@RabbitListener(queues = "rabbitmq.queue", id = "listener")
public class RabbitMQReceiver {
    private static Logger logger = LogManager.getLogger(RabbitMQReceiver.class.toString());
    @RabbitHandler
    public void receiver(MenuOrder menuOrder) {
        logger.info("MenuOrder listener invoked - Consuming Message with MenuOrder Identifier : " + menuOrder.getOrderIdentifier());
    }
}
|
- @RabbitListener is responsible to listen to the RabbitMQ queue for any incoming messages.
- When classifying reading data based on payload type, @RabbitHandler is crucial. Define different methods, annotate each with @RabbitHandler to consume multiple data type payloads from the same queue.
Define the Controller Class
Expose a POST endpoint to send messages to the queue.
 1
 2
 3
 4
 5
 6
 7
 8
 9
10
11
12
13
14
15
16
|
package org.appsdeveloper.rest;
import org.appsdeveloper.queue.RabbitMQSender;
import org.appsdeveloper.domain.MenuOrder;
import org.springframework.beans.factory.annotation.Autowired;
import org.springframework.web.bind.annotation.*;
@RestController
@RequestMapping(value = "/rabbitmq")
public class RabbitMQDemoController {
    @Autowired
    RabbitMQSender rabbitMQSender;
    @PostMapping(value = "/sender")
    public String producer(@RequestBody MenuOrder menuOrder) {
        rabbitMQSender.send(menuOrder);
        return "Message sent to the RabbitMQ Queue Successfully";
    }
}
|
Define the Spring Boot Application Main Class
The following code shows the main application class.
 1
 2
 3
 4
 5
 6
 7
 8
 9
10
11
12
|
package org.appsdeveloper;
import org.springframework.boot.SpringApplication;
import org.springframework.boot.autoconfigure.EnableAutoConfiguration;
import org.springframework.boot.autoconfigure.SpringBootApplication;
@SpringBootApplication
@EnableAutoConfiguration(exclude={org.springframework.boot.autoconfigure.amqp.RabbitAutoConfiguration.class})
public class DemoApplication {
    public static void main(String[] args) {
        System.out.println("Hello");
        SpringApplication.run(DemoApplication.class, args);
    }
}
|
Testing
It’s time to test the flow from the Postman. Let’s hit the Sender API to send the record to the queue:

API has successfully sent the record to the RabbitMQ Queue as per the configuration. As a result, the message was consumed or received by the Listener because we added a logger to the Receiver class.

In the following RabbitMQ snapshot, we can observe the spike that indicates a message was received at the last minute and processed by the consumer.
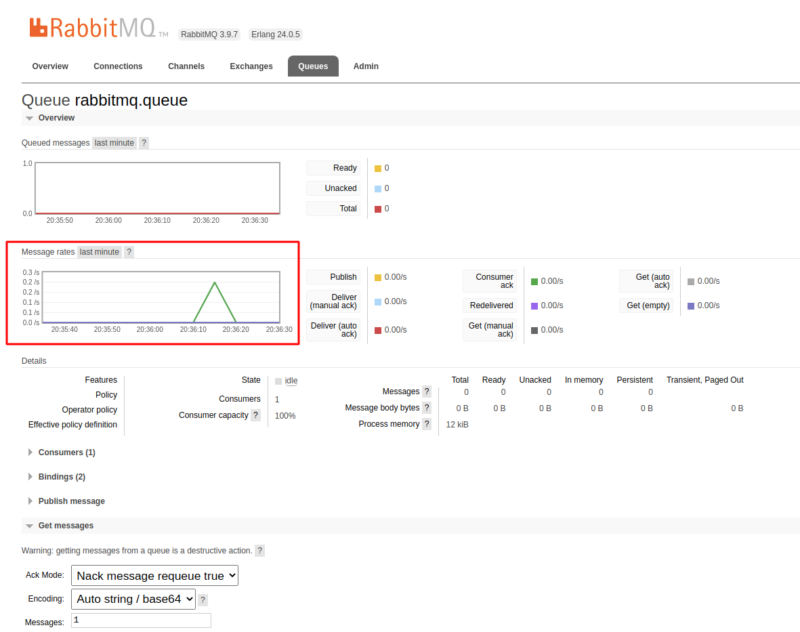
In the above image, we can also see details pertaining to the consumer.
Conclusion
In this article, we learned the fundamentals of RabbitMQ as a messaging queue and examined a practical example that demonstrates how to send and consume messages from queues. However, there exist more complex use-cases of using RabbitMQ but to keep things simple, we kept our use-case minimal, with only one consumer subscribed to a single queue. In addition to this, we also learned the core ideas needed to understand how to implement messaging using RabbitMQ with Spring Boot Application in practice.
If you find this article helpful, don’t forget to share your feedback or thoughts in the comments section.
Happy Coding!
Reference https://www.appsdeveloperblog.com/messaging-using-rabbitmq-in-spring-boot-application/