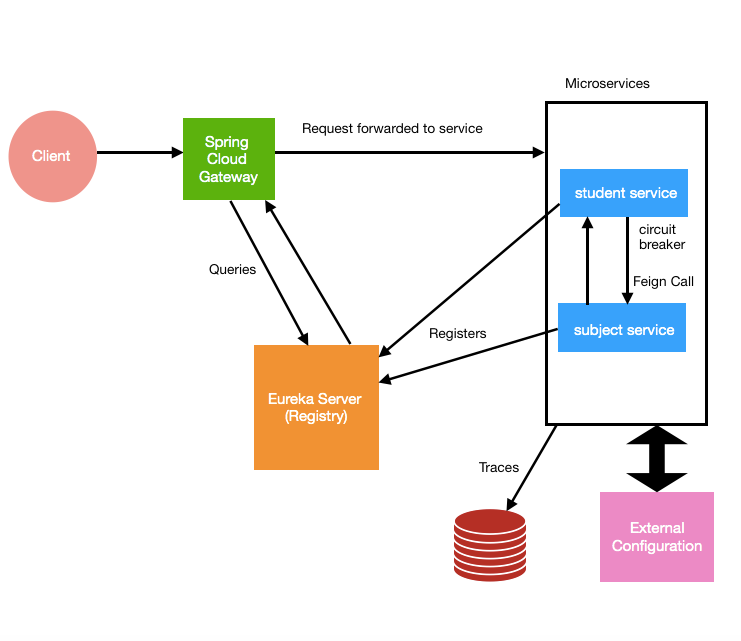
Let’s take a look at the overall microservice architecture that we have built as part of this spring cloud series.

If you have not followed this Spring Cloud series from the beginning, check this index page and bookmark it if needed — Spring Cloud Tutorials.
Why Spring Cloud Config?
When we build a service, there are many values that we don’t want to hardcode and rather read from property files, for instance, endpoints, encrypted values, etc.
If we rely on the property files that are part of the application jar then for each configuration change we will have to rebuild the jar which is a tedious job. So instead, we can add all the properties in an external system like git, svn, etc, and just access them from our services and also enable the services to refresh dynamically when a property is added or edited in the external system.
Implementation
To implement and test an external config server configuration, just 2 services are needed— Config Server and Config Client but in this tutorial, we will continue using the existing services that were mentioned in the previous articles. (Clone the projects mentioned in the conclusion section of Open Feign Tutorial).
Config Server
Now let’s generate a new Spring Boot project from the spring initializr site and add config-server and actuator dependencies in the pom file.
In the application.yml file, add the following properties
8888 is the port where our config server will run and the value provided in the “spring.cloud.config.server.git.uri” is the path to the git repository in your local system. This path could also be the Github web repository URL but for convenience, we have created a local repository under the config folder and added a yml file inside that, we will get into that later.
Config Client
Next, let’s use the existing subject service as a config client. Add the maven dependency in the pom file.
In the application.yml file, add the config server endpoint
management.endpoints…. property is added to access the refresh endpoint of the actuator over HTTP call.
In the resource class of subject service, we have added a property — @Value(“${message:Hello default}”), that will be accessed from the external file.
Now, both our server and client are ready. We need to add an external config file. As mentioned above, we will create a folder named config in the HOME directory (or anywhere you prefer, just make sure to update the URL in config server’s yml file). Inside the config folder, initialize git using the “git init” command. Create a file named subject.yml and add the following content to it
message: “From config file”
Run the registry, config-server, student, and subject services and hit the GET API in the student service
http://localhost:8093/api/student/info
output would be:
From config file
Dynamically Refreshing the code to read the latest from config file
Edit the subject.yml file and call the refresh API provided by the actuator. As our service, subject, is running on port 8094, we will call the actuator refresh API on that port using the POST Curl
The response would be 200 OK.
Now, hit the student API again at http://localhost:8093/api/student/info and you will get the following output.
From config file edited
Congratulations!! We just finished the external config tutorial as well as the Spring Cloud Tutorial with all the key components included in a microservice architecture.
Conclusion
Complete code for the config server is available over Github. If you have already cloned subject service for previous tutorials, please do take an update.